
I still have some of the game sets and the furoshiki available, please email tactileacademia[@]gmail.com for details if you are interested.
In the beginning…
In 2015 I decided to collect the strategies I used in teaching first year university students how to write basic evidence-based essays and put them into a workbook called Writing Essays by Pictures. (You can find out more about this here.) One of the things I never really addressed in this was an overview of the process of researching, drafting, re-researching and rewriting an essay. Not because I wasn’t aware of it, but because it didn’t quite fit into the format of a book. A book is linear, but this process is not only linear (in a way), but also circular. A page, or even a spread, didn’t give me the right format to show this properly. Rather than explaining it with too many words, I decided to leave it out.
And then, I came across a visual way of explaining this that did work: the board game.
The Boardgame Blueprint – Visualising Process
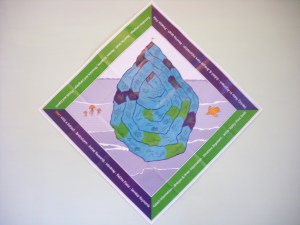
After this realisation I started to work on what could be considered the next chapter of Writing Essays by Pictures (although it is quite independent of it): The Boardgame Blueprint. As the name suggests it is designed in the style of a simple board game using the image of the iceberg to show the visible work over the waterline (drafts and finished essay) as well as the work that goes on (or should go on) out of sight of the official outcome (research, structuring, more research, restructuring, even more research, etc) – and how this process is cyclical in a way.

first poster version
This is something my students seem to struggle with – they barely make it round once! They also often don’t understand the relationship of the sessions we do in class, guided tasks (homework) and the independent work of researching and writing the actual essay. So I made a version of this boardgame visual showing sessions in class, tasks and independent work – and through colour coding showed how this was more scaffolded at the beginning of the course, for example.

rough handout
I also made a version of just the process as a handout for my second year students to remind them of the stuff I taught them the year before. Some of my students really loved it, two even mentioning it as part of the module feedback process as really helpful. So I thought: let’s do this properly and share it on a larger scale!
paper draft
The Gaming Aspect
Initially I only wanted this as a visual, but since it looks like a board game people who saw me working on it kept asking how you would play it. So I thought it might be nice if it could actually be played like a boardgame as well. This means I have also designed ‘Chance’ style cards, a points system and rules.
A Boardgame without a board?
While this is modelled on a boardgame, I decided not to produce it on a board. There are a number of reasons for that, the most obvious is technical: mounting prints on a board that folds is quite tricky if done to a high standard and would have been very time consuming for me (not to mention included numerous false starts); having somebody else do it (or print it onto board directly) would have been quite expensive. The other main reason not to go for a board is that it becomes more difficult to transport – you end up with weird dimensions and something that is heavier, which makes posting it more expensive. Just leaving it as a print on paper, however, doesn’t quite work either. While that is perfect to display, transportation is potentially awkward and needs a cardboard tube to protect it. When playing on it there are potential problems with the paper wanting to roll back up into transportation mode.
Instead of the board or paper, I had it printed on fabric. While this is more expensive than printing on paper, it has a lot of advantages:
- it is more durable than a paper version.
- it can still be displayed as a poster, particularly on a pinboard.
- if displayed on a pinboard, you can also use pins to add information to it, for example what session you are dealing with this week, what stage students should be up to at this moment, or flags with deadlines for drafts on them. (Doing that on a poster or board would leave marks and couldn’t be done more than once.)
- transport becomes really easy, as it can be folded and packed and it is lightweight.
- printing it on fabric allows you to think of it as a furoshiki – a Japanese Wrapping Cloth.
Going off on a tangent – a furo-what?
‘Furoshiki’ is the name the Japanese give to square pieces of fabric, often elaborately illustrated, used in a number of ways, but mainly to wrap things, either to carry or to give as gifts. There are a number of different ways of wrapping specific types of items (like a book or a bottle) just using folds and knots. For me it’s a way of reminding me that this artefact is not just a poster made of fabric, or a non-board board game, it also makes me consider other ways in which it could be used: it could be a scarf or bandana, a tablecloth, it could transform into a bag or a dustjacket.
I have previously produced an academically themed furoshiki and given it to workshop participants instead of a conference bag. (Read more about that here.) Delegates really appreciated receiving this special keepsake, which also kept their conference pack together and could double up as a poster reminding them of one of the key theories discussed on the day. As not everybody might want the game version, having a furoshiki version makes sense.
Wrapping it up – how could you use this?
As a student
- you could review it to remind yourself of the circular way of essay production and how many steps are hidden from sight.
- you could use it as a template for the planning of your work and to keep track of where you are.
As a teacher
- you could use it to help your students visualise the process of essay writing.
- you could display the poster/furoshiki to give students something to read while they are waiting in the corridor outside of your office. Who knows, something might stick 😉
- you could give out the handout to your students so that they have a reminder on hand when doing the work. Also great colouring-in potential in case you want to colour code something, such as sessions you are teaching or deadlines.
- you could use it to get student groups to play the game while you are busy doing tutorials with some of them.
As neither students nor teacher, you might still want this because
- you could start your own collection of academic furoshiki. (I might make some more in the future…)
- you could give it as a gift to a beginning student – or use it to wrap another gift.
- you could use it as a scarf, bandana or table cloth because you like the colour and design, rather than the message.
I still have some of the game sets and the furoshiki available, please email tactileacademia[@]gmail.com for details if you are interested.

The A4 handout
Download the A4 handout version of the game, slightly simplified and in black and white, for you to use here: Boardgame Blueprint Handout
